Introduction to Temperature Sensors and Arduino
A temperature sensor is an electronic device that measures the degree of hotness or coldness in its environment and converts it into an electrical signal that can be read by a microcontroller.
These sensors play a crucial role in a wide range of applications such as weather monitoring, home automation, greenhouses, smart appliances, and robotics.
One of the most commonly used sensors in beginner electronics is the DHT11 or DHT22. These sensors can measure both temperature and humidity, making them ideal for environmental monitoring projects. The DHT11 provides digital output directly, which means no complex analog-to-digital conversion is required.
When connected to an Arduino, the sensor’s data can be easily read, processed, and displayed through the Serial Monitor, LCD screen, or even sent wirelessly to IoT dashboards. Arduino serves as the “brain” that interprets the sensor’s signal and transforms it into readable information in Celsius (°C) and Fahrenheit (°F).
By using a temperature sensor with Arduino, students and hobbyists can learn how electronic components interact, how to process sensor data, and how to create responsive systems that react to environmental changes — a foundational step toward building smart devices and automation systems.
Components Needed
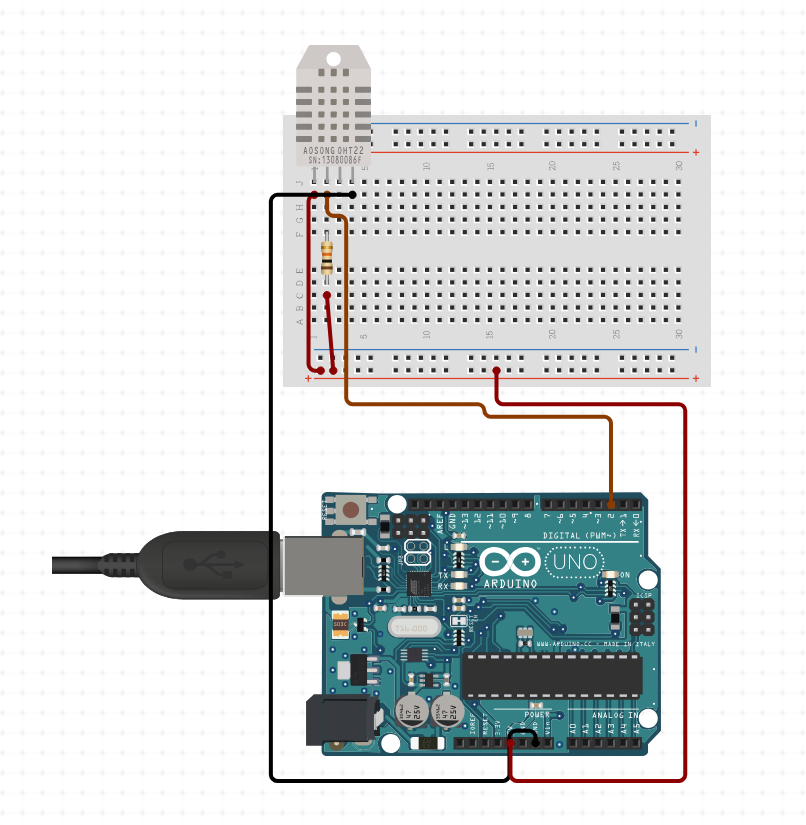
No. | Component | Quantity | Description |
1 | Arduino UNO board | 1 | The microcontroller that processes data from the sensor |
2 | DHT11 or DHT22 sensor | 1 | Measures temperature and humidity |
3 | 10kΩ resistor | 1 | Pull-up resistor for stable data communication |
4 | Breadboard | 1 | For easy wiring without soldering |
5 | Jumper wires (male-to-male) | 4–5 | Connect components to Arduino |
Wiring Connections
DHT Sensor Pin | Connected To | Description |
VCC (Pin 1) | 5V (Arduino) | Powers the sensor |
DATA (Pin 2) | Digital Pin 2 (Arduino) | Sends humidity & temperature data |
NC (Pin 3) | — | Not connected (no function) |
GND (Pin 4) | GND (Arduino) | Common ground |
Procedure
- Set up the breadboard:
- Insert the DHT11/DHT22 sensor on the breadboard.
- Connect the power (VCC) and ground (GND) lines to the Arduino 5 V and GND respectively.
- Connect the data pin:
- Use a jumper wire to connect the sensor’s data pin to Arduino Digital Pin 2.
- Place the 10 kΩ resistor between VCC and DATA on the breadboard.
- Power the Arduino:
- Plug the Arduino into your computer using a USB cable.
- Upload the sketch (program):
- Use the Arduino IDE to upload your DHT sensor reading code.
- Open the Serial Monitor to view live readings (in °C, °F, and % humidity).
How It Works
- Sensor Function:
- The DHT11/DHT22 contains a thermistor (for temperature) and a capacitive humidity sensor.
- It measures the relative humidity of the air and ambient temperature.
- Data is sent as a digital signal (not analog) through the data pin to the Arduino.
- Microcontroller Role:
- The Arduino UNO receives this data, interprets the signal using the DHT library, and converts the raw bits into meaningful temperature and humidity values.
- Output:
- The Arduino then displays the temperature in Celsius and Fahrenheit and humidity in percentage on the Serial Monitor (or optionally on an LCD/OLED display).
- Summary
Function | Description |
Purpose | Measure temperature and humidity using a DHT sensor and display data via Arduino |
Key Component | DHT11/DHT22 sensor with 10 kΩ pull-up resistor |
Power Source | 5 V from Arduino |
Output | Temperature (°C and °F), Humidity (%) via Serial Monitor |